I just added a new page called Fashion forecast where I make my predictions for the next big trends. This is solely based on styles that have popped out to me as fun, funky new trends that I'm starting to notice pop up here and there and that I'm predicting will be the next big thing. Check it out!
Sneak peak - Skulls
Tuesday, August 14, 2012
Wednesday, August 8, 2012
Bridesmaid Dresses
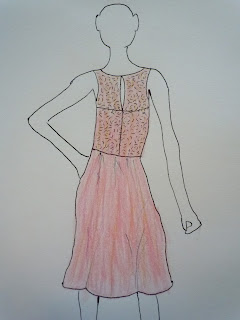
So in addition to making my wedding dress I also decided to make my four bridesmaid dresses. Yes, I am crazy. But in the end it was so rewarding to see all my beautiful bridesmaids in the dresses I made specially for them. Since I am still very much a beginner to fashion design I went off two different patterns to make the four different dresses. From those basic patterns I altered each pattern to make it unique to the girl wearing it and to fit in with the 50's inspired aesthetic of the wedding. Here's each of my bridesmaids on the big day and my sketch of the altered look.
Dress 1

Dress 2

Dress 1
Strapless sweetheart dress with sparkle overlay bodice and A-line knee length skirt.
My alteration for this pattern was adding the sparkle sheer overlay over the bodice, which I actually took from the same pattern as my wedding dress. But I kept the high back sewing the zipper to the middle of the back and leaving the slit to the top, which was secured with a button at the top.

Dress 2
One strap dress with ruched sash and A-line skirt. The different aspect of this dress is the tri-tone aspect of the fabric.

However, once I cut the pattern I found out the gradient aspect of the fabric was so gradual the bodice, sash and skirt of the dress looked like three different fabrics. But in the end we were both still happy with how it turned out.
Dress 3
High necked bodice with a bejeweled neckband and belt and a fitted pencil skirt.
The alteration to this pattern was to make the high back into a low cut racerback.
Dress 4
This dress is from the same pattern as dress 3, but instead of a neckband I used sheer fabric from the wire sheer overlay for the A line skirt to attach the front and back bodice with a large bow in the center.
I also cut out a half circle in the lower back to give this ultra girly dress a sexy cutout.
Tuesday, August 7, 2012
Rapunzel
My friend Kasey works for a company that does dress up entertainment for children's parties, so she wanted a Rapunzel dress to go with the Disney movie that came out recently. Since I couldn't find a pattern that exactly matched the dress from the movie, I used a pattern for a renaissance dress and took in the fullness and length of the skirt to make it more youthful and airy like the movie. I also altered the sleeves to include a puff cap sleeve and a sheer 3/4 length sleeve that has lace detailing and painted on detail. To make the painted detail I cut out pieces of stenciling and painted the fabric with lavender and purple fabric paint with a clear sparkle fabric paint over it. I also altered the back bodice of the dress to include a sheer panel on the back and button detailing.
It took several several months to take on this specific and detailed of a dress. It is by far the most difficult outfit I've made so far. However, I am so proud of the finished product. This is the most accurate replica of the dress I have seen so far and although my craftsmanship is not yet up to the perfection I'm striving for, I am very happy with what I've produced so far. I'll also have another photo shoot of Kasey in her dress to come soon!
It took several several months to take on this specific and detailed of a dress. It is by far the most difficult outfit I've made so far. However, I am so proud of the finished product. This is the most accurate replica of the dress I have seen so far and although my craftsmanship is not yet up to the perfection I'm striving for, I am very happy with what I've produced so far. I'll also have another photo shoot of Kasey in her dress to come soon!
Here's a view of the sheer paneling in the back.
The hem of the dress was finished with a lace trim sewn on the lining.
Close up of the sheer 3/4 length sleeve with painted detailing.
I loved the puff cap sleeves with a ribbon overlay.
Subscribe to:
Comments (Atom)


